Applying Boris Red in Canopus® Edius® - Boris FX
Applying Boris Red in Canopus® Edius® - Boris FX
Applying Boris Red in Canopus® Edius® - Boris FX
Create successful ePaper yourself
Turn your PDF publications into a flip-book with our unique Google optimized e-Paper software.
<strong>Apply<strong>in</strong>g</strong> <strong>Boris</strong> <strong>Red</strong> <strong>in</strong> <strong>Canopus®</strong> <strong>Edius®</strong><br />
Beg<strong>in</strong>n<strong>in</strong>g with version 3.02, <strong>Boris</strong> <strong>Red</strong> now supports Canopus Edius Pro 3. Canopus Edius Pro 3 allows you to apply<br />
<strong>Red</strong> as a Þlter and as a transition. <strong>Boris</strong> <strong>Red</strong> appears <strong>in</strong> the Edius Effect Palette <strong>in</strong> both the Video Filters and Transitions<br />
directories and can be applied the same way you apply any native video effects <strong>in</strong> Edius. <strong>Red</strong> works <strong>in</strong> Edius whether<br />
or not you have hardware <strong>in</strong>stalled. You can use any footage to complete the follow<strong>in</strong>g tutorial.<br />
You can also use the standalone <strong>Red</strong> Eng<strong>in</strong>e to create effects. See the next section for details.<br />
Work<strong>in</strong>g with the <strong>Boris</strong> <strong>Red</strong> Eng<strong>in</strong>e<br />
Instead of work<strong>in</strong>g with<strong>in</strong> a host application, you can use the <strong>Red</strong> Eng<strong>in</strong>e as a standalone application. The <strong>Red</strong> Eng<strong>in</strong>e<br />
features the same user <strong>in</strong>terface as the plug-<strong>in</strong> used with<strong>in</strong> your Edius host application. The only difference <strong>in</strong> the<br />
<strong>in</strong>terface is that the Apply and Cancel buttons do not appear <strong>in</strong> the timel<strong>in</strong>e. Instead, the <strong>Red</strong> Eng<strong>in</strong>e lets you export<br />
Þles as QuickTime, AVI or Flash from the Render Queue <strong>in</strong> the Project w<strong>in</strong>dow.<br />
Unlike the plug-<strong>in</strong>, you cannot use Edius timel<strong>in</strong>e video with the <strong>Red</strong> Eng<strong>in</strong>e. The default video images are proxy<br />
images that you can use to create effects when your media is unavailable. You can also import still images, EPS or movie<br />
Þles, or create color, gradient, spl<strong>in</strong>e object, spl<strong>in</strong>e primitive or text media.<br />
<strong>Apply<strong>in</strong>g</strong> <strong>Boris</strong> <strong>Red</strong> as a Filter<br />
To apply <strong>Red</strong> as a Þlter with<strong>in</strong> Edius, perform the follow<strong>in</strong>g steps.<br />
1.<br />
2.<br />
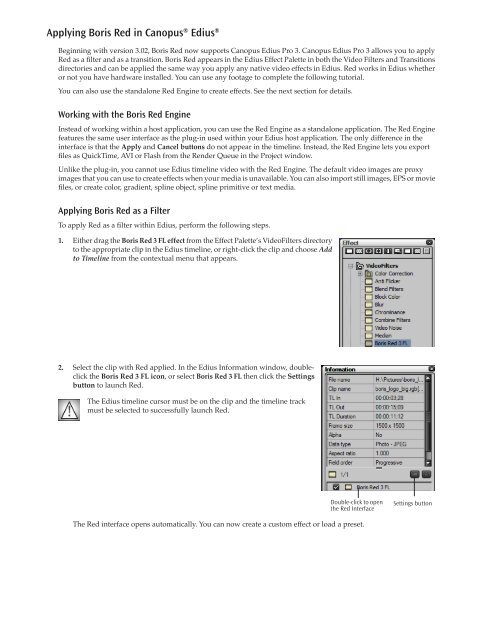
Either drag the <strong>Boris</strong> <strong>Red</strong> 3 FL effect from the Effect Palette’s VideoFilters directory<br />
to the appropriate clip <strong>in</strong> the Edius timel<strong>in</strong>e, or right-click the clip and choose Add<br />
to Timel<strong>in</strong>e from the contextual menu that appears.<br />
Select the clip with <strong>Red</strong> applied. In the Edius Information w<strong>in</strong>dow, doubleclick<br />
the <strong>Boris</strong> <strong>Red</strong> 3 FL icon,<br />
or select <strong>Boris</strong> <strong>Red</strong> 3 FL then click the Sett<strong>in</strong>gs<br />
button to launch <strong>Red</strong>.<br />
The Edius timel<strong>in</strong>e cursor must be on the clip and the timel<strong>in</strong>e track<br />
must be selected to successfully launch <strong>Red</strong>.<br />
Double-click to open<br />
the <strong>Red</strong> Interface<br />
The <strong>Red</strong> <strong>in</strong>terface opens automatically. You can now create a custom effect or load a preset.<br />
Sett<strong>in</strong>gs button
3.<br />
You can open sett<strong>in</strong>gs from the KeyFrame Library and either use them as is or modify them to create your<br />
own custom effect. To open the Library Browser choose W<strong>in</strong>dow > Library Browser, click the Open Library<br />
Browser button <strong>in</strong> the timel<strong>in</strong>e or press Command-9.<br />
The Þrst time you browse the KeyFrame Library effects with<strong>in</strong> the Library Browser you must generate<br />
thumbnail images for the effects. Until you generate thumbnails, the previews will not display. For more<br />
<strong>in</strong>formation, see““Important Information on Us<strong>in</strong>g the KeyFrame Library” on page 5.<br />
The Library Browser
4.<br />
5.<br />
6.<br />
7.<br />
8.<br />
Click the name of any folder <strong>in</strong> the Available Categories w<strong>in</strong>dow. Thumbnail images of each effect <strong>in</strong> that folder<br />
appear <strong>in</strong> the Available Effects w<strong>in</strong>dow. You may have to click a disclosure triangle to view subcategories.<br />
Click any thumbnail image to select the effect. A red box appears around the selected thumbnail. Press Play to view<br />
an animated RAM preview <strong>in</strong> the Preview w<strong>in</strong>dow.<br />
If the sett<strong>in</strong>gs Þle was saved without a preview, no preview image is associated with that thumbnail.<br />
However, you can still preview and apply the effect by creat<strong>in</strong>g a thumbnail us<strong>in</strong>g the Generate<br />
Thumbnails button,<br />
described <strong>in</strong> “Important Information on Us<strong>in</strong>g the KeyFrame Library” on page 5.<br />
Click the Load Effect button to create a new composition conta<strong>in</strong><strong>in</strong>g the currently selected effect. If you have<br />
not yet saved the effect <strong>in</strong> your timel<strong>in</strong>e, a dialog box appears. Click Don’t Save to discard the current effect<br />
and open the effect from the Browser. Click Cancel to return to the Browser. You can also double-click a<br />
thumbnail to apply the effect to your timel<strong>in</strong>e.<br />
When you Þnish creat<strong>in</strong>g your effect, press the Apply button or Cancel button <strong>in</strong> the bottom right corner<br />
of the <strong>Red</strong> Timel<strong>in</strong>e w<strong>in</strong>dow. This either applies the effect to Edius or cancels, leav<strong>in</strong>g the Edius track<br />
unchanged.<br />
Render <strong>Boris</strong> <strong>Red</strong> effects the same way you would render any other effect. For more <strong>in</strong>formation, consult the Edius<br />
documentation.<br />
<strong>Apply<strong>in</strong>g</strong> <strong>Boris</strong> <strong>Red</strong> as a Transition<br />
Edius <strong>in</strong>cludes three types of transitions: In, Out and S<strong>in</strong>gle Track.<br />
Due to current limitations <strong>in</strong> the Edius plug-<strong>in</strong><br />
architecture, <strong>Boris</strong> <strong>Red</strong> will not work as desired when applied as an Out transition. You should create <strong>Red</strong> transitions<br />
<strong>in</strong> Edius as either S<strong>in</strong>gle Track or In transitions. To apply <strong>Red</strong> as a transition with<strong>in</strong> Edius, perform the follow<strong>in</strong>g steps.<br />
1.<br />
2.<br />
Drag the <strong>Boris</strong> <strong>Red</strong> 3 TR effect from the Effect Palette’s Transitions directory to a<br />
S<strong>in</strong>gle Track or In transition <strong>in</strong> the timel<strong>in</strong>e.<br />
Select the transition. In the Edius Information w<strong>in</strong>dow, double-click the <strong>Boris</strong> <strong>Red</strong><br />
3 FL icon,<br />
or select <strong>Boris</strong> <strong>Red</strong> 3 FL then click the Sett<strong>in</strong>gs button to launch <strong>Red</strong>.<br />
The Edius timel<strong>in</strong>e cursor must be on the transition and the timel<strong>in</strong>e track<br />
must be selected to successfully launch <strong>Red</strong>.<br />
The <strong>Red</strong> <strong>in</strong>terface opens automatically. You can now create or load an effect.<br />
NOTE: When us<strong>in</strong>g <strong>Boris</strong> <strong>Red</strong> as a Transition effect <strong>in</strong> Edius, the Edius<br />
Palettes rema<strong>in</strong> above the <strong>Boris</strong> w<strong>in</strong>dows. <strong>Boris</strong> <strong>FX</strong> has reported this issue to Canopus and is work<strong>in</strong>g with<br />
them to resolve it <strong>in</strong> a future release of Edius. Currently, to work around this issue, you should position the<br />
Edius Palettes and <strong>Boris</strong> w<strong>in</strong>dows so they don't overlap.<br />
You can now create a custom transition or load a preset <strong>in</strong> <strong>Red</strong>.
3.<br />
4.<br />
5.<br />
6.<br />
7.<br />
8.<br />
You can open transition preset sett<strong>in</strong>gs from the KeyFrame Library and either use them as is or modify<br />
them to create your own custom effect. To open the Library Browser choose W<strong>in</strong>dow > Library Browser,<br />
click the Open Library Browser button <strong>in</strong> the timel<strong>in</strong>e or press Command-9.<br />
The Þrst time you browse the KeyFrame Library effects with<strong>in</strong> the Library Browser you must generate<br />
thumbnail images for the effects. For more <strong>in</strong>formation, see “Important Information on Us<strong>in</strong>g the KeyFrame<br />
Library” on page 5.<br />
The Library Browser<br />
Transitions effects<br />
Click the name of any folder <strong>in</strong> the Available Categories w<strong>in</strong>dow. Thumbnail images of each effect <strong>in</strong> that folder<br />
appear <strong>in</strong> the Available Effects w<strong>in</strong>dow. The <strong>Red</strong> KeyFrame Library <strong>in</strong>cludes a Transitions category.<br />
Click any thumbnail image to select the effect. A red box appears around the selected thumbnail. Press Play to view<br />
an animated RAM preview <strong>in</strong> the Preview w<strong>in</strong>dow.<br />
If the sett<strong>in</strong>gs Þle was saved without a preview, no preview image is associated with that thumbnail.<br />
However, you can still preview and apply the effect by creat<strong>in</strong>g a thumbnail us<strong>in</strong>g the Generate<br />
Thumbnails button,<br />
described <strong>in</strong> “Important Information on Us<strong>in</strong>g the KeyFrame Library” on page 5.<br />
Click Load Effect to create a new composition conta<strong>in</strong><strong>in</strong>g the currently selected effect. If you have not yet saved the<br />
effect <strong>in</strong> your timel<strong>in</strong>e, a dialog box appears. Click Save to save the current effect before open<strong>in</strong>g the Browser effect.<br />
Click Don’t Save to discard the current effect and open the effect from the Browser. Click Cancel to return to the<br />
Browser. You can also double-click a thumbnail to apply the effect to your timel<strong>in</strong>e.<br />
When you Þnish creat<strong>in</strong>g your effect, press the Apply button or Cancel button <strong>in</strong> the bottom right corner<br />
of the <strong>Red</strong> Timel<strong>in</strong>e w<strong>in</strong>dow. This either applies the effect to Edius or cancels, leav<strong>in</strong>g the Edius event or<br />
track unchanged.<br />
Render <strong>Boris</strong> <strong>Red</strong> effects the same way you would render any other effect. For more <strong>in</strong>formation, consult the Edius<br />
documentation.
Stack<strong>in</strong>g Multiple Overlapp<strong>in</strong>g <strong>Boris</strong> Effects<br />
You should not add multiple <strong>Red</strong> effects to an Edius clip or stack clips conta<strong>in</strong><strong>in</strong>g <strong>Boris</strong> effects on multiple layers <strong>in</strong> the<br />
Edius timel<strong>in</strong>e. This may work, but depend<strong>in</strong>g on your system, multiple <strong>Boris</strong> effects on a clip may not render properly.<br />
Instead, apply a s<strong>in</strong>gle <strong>Red</strong> effect to an Edius clip and add multiple Þlters to the clip with<strong>in</strong> <strong>Red</strong>.<br />
This limitation only applies to effects that overlap exactly. For example, a track conta<strong>in</strong><strong>in</strong>g both an In and an<br />
Out transition would not fall under this suggestion (s<strong>in</strong>ce they cannot overlap).<br />
Important Information on Us<strong>in</strong>g the KeyFrame Library<br />
The Þrst time you browse the KeyFrame Library effects with<strong>in</strong> the Library Browser you must generate thumbnail<br />
images for the effects. You only need to do this once.<br />
1.<br />
2.<br />
3.<br />
4.<br />
Launch the standalone <strong>Boris</strong> <strong>Red</strong> Eng<strong>in</strong>e.<br />
You should build thumbnail previews for the KeyFrame Library <strong>in</strong> the standalone <strong>Red</strong> Eng<strong>in</strong>e rather than<br />
with<strong>in</strong> Edius. Because build<strong>in</strong>g previews actually renders your effect, this process can take as much as 25-30%<br />
longer <strong>in</strong> the plug-<strong>in</strong> than <strong>in</strong> the <strong>Red</strong> Eng<strong>in</strong>e.<br />
Open the <strong>Boris</strong> Library Browser, by choos<strong>in</strong>g W<strong>in</strong>dow > Library Browser, click<strong>in</strong>g the Open Library<br />
Browser button <strong>in</strong> the timel<strong>in</strong>e or press<strong>in</strong>g Command-9.<br />
Select the <strong>Red</strong> 3.0 Keyframe Library folder <strong>in</strong> the Available Categories w<strong>in</strong>dow. This will render all the<br />
thumbnails. Alternatively, you can select <strong>in</strong>dividual categories or even <strong>in</strong>dividual effects.<br />
Click the Generate Thumbnails button.<br />
For more <strong>in</strong>formation on us<strong>in</strong>g the KeyFrame Library, see Volume<br />
I of the <strong>Red</strong> User Guide.


