DIY Planted Background Wall
Have you been wanting to change up your aquarium background to something unique? Perhaps it’s time to try a planted wall! A wall of plants is a great way to add extra foliage and shelter for your tank while giving your tank an incredible and unique look.
When most people think of planted walls in aquariums, they think of moss walls. For those of you who have made successful moss walls for your aquariums, can you share your secrets? We haven’t had huge success with moss-only walls. In the past, we found that the moss on the top grows faster. It creates more shade, so it shades out the moss on the bottom. The moss on the bottom starts dying. Moss is a wonderful plant, but it’s hard to attach it to something.
So, how can we make a better version ourselves?
Plant Types and Background Materials
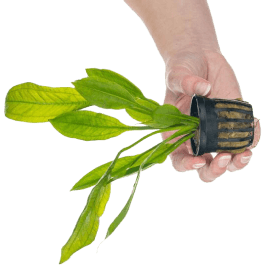
For one, we’re going to start with different plants than moss. You want to choose plants that do well in low lighting and that both love to attach to a solid surface and thrive being on that surface. Excellent plant choices include Anubias, Java Ferns, Hygrophila pinnatifida, and similar types. The petite version of Anubias are ideal because they stay small. However, both Anubias and Java Fern take a long time to grow.

The second thing we want to use is a suitable background material. While a spongy filter type of material can be used, it’s not sturdy enough to stretch the entire side wall of a larger tank. It’s only optimal in smaller quantities.
So, what is a better background material that is so highly recommended? We love Matala Mat. This is a filter pad material that It can be purchased at a koi pond supplier, like Drs. Foster and Smith. You can also find it on Amazon. It comes in different colors, like blue, black, or green. The green is best for aquarium backgrounds, and you want a thickness of around 1.5”. This sturdy plastic material is woven into a mesh. It won’t bend or fold over like a spongy material. You want one that has a smaller mesh without as many large holes. To cut it to the size of your background, you use a serrated blade. A thick sheet comes in at around 39.5” x 24” in size.

The third supply necessary for our background is plain, green yarn. Yes, we’re not crazy! Yarn is better than fishing line, because fishing line can hurt your fingers and cut into the plants. Yarn is easy to work with and inexpensive. Buy one that is 100% acrylic for aquariums. That way, it won’t break down in aquariums. No wool or cotton, since those will rot. We picked green because it matched the mat, but you can have any color you like.

The fourth thing to purchase are large plastic needles that have large eyes to thread the acrylic yarn through. These needles will fit through the Matala Mat mesh easily so that you can ‘sew’ your plants to it!

Placing Your Plants on the Mat
How you place your plants on the background mat is important, because you don’t want the ones on top to shade the lower ones. We prefer using Anubias nana petite because the leaves are small and it won’t grow very large. However, it does take a very long time to grow. It might take up to a year and a half to fully cover the mat. Java Fern is less expensive than Anubias petite, but it does get leafier and grows faster. Anything that roots and creates an aquatic ‘ground cover’ will work.

With all your plants, take them out of the pots and clean off the root wool to expose the roots. You won’t need very long roots. Using scissors, trim the roots down to about half an inch long. That way, they will grow into the mat as they get longer.
So, unroll your yarn out to about one foot in length, and cut off a piece. Thread the yarn through your needle eye, with a nice long tail. By the way if you click on these video captures it will take you to that step in the video.

Pick a spot in the middle of the Matala Mat. Thread the needle up through the middle and pull the yarn through to the back. On the back, move the needle about an inch to the side and sew it up through to the front again. You now have two longer lengths of yarn coming up on either side of a one-inch gap.

Within that inch space, it’s time to attach the Anubias plant. Orientate it in the direction that you want it to grow. Carefully wrap the yarn around it and tie with a simple knot. Cinch it down so it will stay, and double knot. Cut the yarn ends about half an inch.
So, that’s it! You can repeat this process to attach more plants and ‘sew’ them on.
Growth Direction
With your plants, make sure to attach them in the direction you want them to grow. The ones on the sides might grow down diagonally, while other ones will grow up diagonally. Spend some time thinking about the orientation.
You don’t need many plants to eventually have a beautiful living Matala Mat background wall. Seven bunches of Anubias and several bunches of Java Fern would be ideal for a nice large Matala Mat background!